本文最后更新于:2023年5月21日 凌晨
Linux From Scratch 11.3 再实践 再次失败。
1. 准备工作 虚拟机用功能齐全的VMware,宿主机用熟悉的Ubuntu,安装虚拟机时,选择最小安装,给30G全用上,后面再另开一个虚拟硬盘放LFS。
1.1. 检查Ubuntu虚拟机的软件环境 1 2 3 4 5 6 7 8 9 10 11 12 13 14 15 16 17 18 19 20 21 22 23 24 25 26 27 28 29 30 31 32 33 34 35 36 37 38 39 40 41 42 43 44 45 46 47 48 49 50 cat > version-check.sh << "EOF" export LC_ALL=Chead -n1 | cut -d" " -f2-4readlink -f /bin/sh)echo "/bin/sh -> $MYSH " echo $MYSH | grep -q bash || echo "ERROR: /bin/sh does not point to bash" unset MYSHecho -n "Binutils: " ; ld --version | head -n1 | cut -d" " -f3-head -n1if [ -h /usr/bin/yacc ]; then echo "/usr/bin/yacc -> `readlink -f /usr/bin/yacc`" ;elif [ -x /usr/bin/yacc ]; then echo yacc is `/usr/bin/yacc --version | head -n1`else echo "yacc not found" fi echo -n "Coreutils: " ; chown --version | head -n1 | cut -d")" -f2head -n1head -n1head -n1if [ -h /usr/bin/awk ]; then echo "/usr/bin/awk -> `readlink -f /usr/bin/awk`" ;elif [ -x /usr/bin/awk ]; then echo awk is `/usr/bin/awk --version | head -n1`else echo "awk not found" fi head -n1head -n1head -n1head -n1cat /proc/versionhead -n1head -n1head -n1echo Perl `perl -V:version`head -n1head -n1head -n1 head -n1echo 'int main(){}' > dummy.c && g++ -o dummy dummy.cif [ -x dummy ]then echo "g++ compilation OK" ;else echo "g++ compilation failed" ; fi rm -f dummy.c dummy
根据输出解决问题
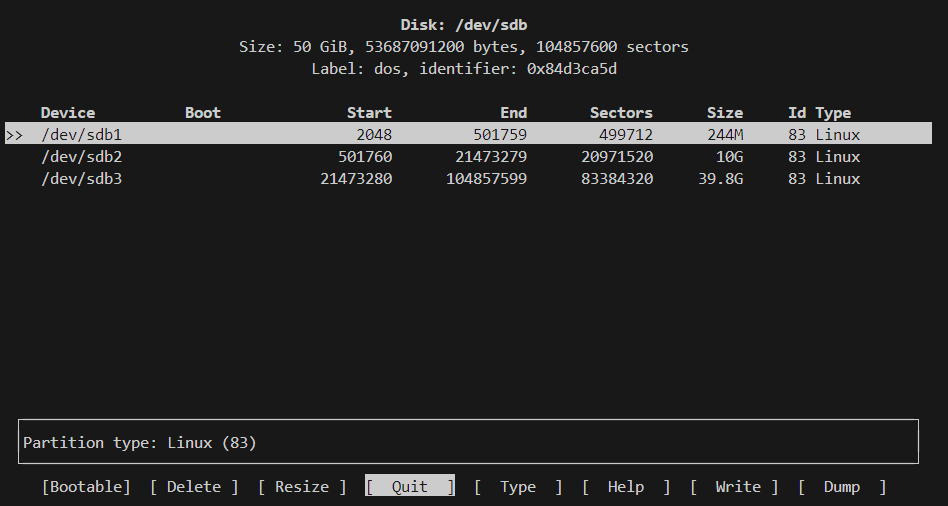
1.2. 创建新的分区 给虚拟机增加一块大小为50G的硬盘,然后使用cfdisk命令去建分区。
将这块硬盘分三个区,boot,swap,root,如下图所示
1.3. 在分区上建立文件系统 1 2 3 mkfs -v -t ext4 /dev/sdb1
1.4. 设置$LFS环境变量 修改需要用到的用户的bashrc 文件
1 2 3 4 5 vi ~/.bashrcexport LFS=/mnt/lfssource ~/.bashrc
1.5. 挂载新的分区 挂载的同时并加入fstab
1 2 3 4 5 6 7 8 9 10 mkdir -pv $LFS $LFS mkdir -v $LFS /boot$LFS /boot
1.6. 下载所需软件包 1 2 3 4 5 6 7 8 mkdir -v $LFS /sourceschmod -v a+wt $LFS /sourcescontinue --directory-prefix=$LFS /sourcespushd $LFS /sourcesmd5sum -c md5sumspopd
1.7. 创建有限目录布局 1 2 3 4 5 6 7 8 9 mkdir -pv $LFS /{etc,var} $LFS /usr/{bin,lib,sbin}for i in bin lib sbin; do ln -sv usr/$i $LFS /$i done case $(uname -m) in mkdir -pv $LFS /lib64 ;;esac mkdir -pv $LFS /tools
1.8. 添加LFS用户并配置 1 2 3 4 5 6 7 8 9 10 11 12 13 14 15 16 17 18 19 20 21 22 23 24 25 26 27 28 29 30 31 32 groupadd lfschown -v lfs $LFS /{usr{,/*},lib,var,etc,bin,sbin,tools}case $(uname -m) in chown -v lfs $LFS /lib64 ;;esac cat > ~/.bash_profile << "EOF" exec env -i HOME=$HOME TERM=$TERM PS1='\u:\w\$ ' /bin/bashcat > ~/.bashrc << "EOF" set +humask 022uname -m)-lfs-linux-gnuif [ ! -L /bin ]; then PATH=/bin:$PATH ; fi $LFS /tools/bin:$PATH $LFS /usr/share/config.siteexport LFS LC_ALL LFS_TGT PATH CONFIG_SITEmv -v /etc/bash.bashrc /etc/bash.bashrc.NOUSEsource ~/.bash_profile
用Vmware拍个快照记录一下
2. 编译交叉工具链 在lfs用户下使用上一次的代码
解压与删除啥的就不再赘述了
将所需要用到的压缩包统一解压
1 2 3 4 tar -xf binutils-2.40.tar.xz
注意gcc会用到两次,记得解压两次
接下来就不照搬文档中的代码了
安装Glibc时需要注意一下代码的顺序
3. 交叉编译临时工具 仍然以lfs的角色身份进行。
出现错误error "Assumed value of MB_LEN_MAX wrong",查阅LFS官网寻找解决问题,退回到第一次构建gcc。
This error message usually indicates that limits.h provided by GCC isn’t including limits.h from Glibc as it should be. There is one command as a workaround for limits.h in GCC Pass 1. Do not forget to run the command.
发现是因为少敲了这一串代码
1 2 3 cd ..cat gcc/limitx.h gcc/glimits.h gcc/limity.h > \dirname $($LFS_TGT -gcc -print-libgcc-file-name)`/install-tools/include/limits.h
利用快照重新开始。重新开始后一切顺利
4. 进⼊ Chroot 并构建其他临时⼯具 此时将用户切换为root。一切按文档操作,部分特殊情况将继续罗列。
无事发生,因为我们有快照,就不用备份了,照常删除无用的东西,然后继续!这次我就不睡觉了,直接通宵做完!
5. 安装基本系统软件 先做个快照,然后按照文档继续。文档所列出的错误这里不再赘述。
在编译glibc时,耗时较久,因为时在虚拟机编译,所以多了一个报错,tst-mutex10,并不影响。
配置glibc时
1 ln -sfv /usr/ share/zoneinfo/ Asia/Shanghai / etc/localtime
安装tcl时
1 2 3 tar -xf tcl8.6 .13 -src.tar.gzcd tcl8.6 .13 tar -xf ../tcl8.6 .13 -html.tar.gz --strip-components=1
安装gcc时测试
1 2 chown -Rv tester ."PATH=$PATH make -k -j8 check"
测试结果与文档提供的结果 别无二致
安装sed时测试
1 2 chown -Rv tester ."PATH=$PATH make -j8 check"
安装intltool时
1 2 make install
安装ninja时
1 2 3 install -vm755 ninja /usr/bin/
安装meson时
1 2 3 pip3 install --no-index --find-links dist meson
安装findutils时
1 2 chown -Rv tester ."PATH=$PATH make -j8 check"
安装groff时
1 PAGE=A4 ./configure --prefix=/usr
安装grub时
1 2 make installmv -v /etc/bash_completion.d/grub /usr/share/bash-completion/completions
安装ninja时
1 tar -xf ../../systemd-man-pages-252-2.tar.xz --strip-components=1 -C /usr/share/man
安装utils-linux时
1 2 chown -Rv tester ."make -k -j8 check"
安装E2fsprogs时,出现Tests failed: m_assume_storage_prezeroed,在文档中已列出的与之错误不同,在另一版本文档 中与之相同,那就做个快照略过。
1 2 3 4 5 6 gunzip -v /usr/share/info/libext2fs.info.gz
移除调试符号
1 2 3 4 5 6 7 8 9 10 11 12 13 14 15 16 17 18 19 20 21 22 23 24 25 26 27 28 29 30 31 32 33 34 35 36 37 38 39 40 41 42 43 44 45 46 47 48 49 50 51 52 53 54 55 save_usrlib="$(cd /usr/lib; ls ld-linux*[^g]) libc.so.6 libthread_db.so.1 libquadmath.so.0.0.0 libstdc++.so.6.0.30 libitm.so.1.0.0 libatomic.so.1.2.0" cd /usr/libfor LIB in $save_usrlib ; do $LIB $LIB .dbgcp $LIB /tmp/$LIB $LIB $LIB .dbg /tmp/$LIB $LIB /usr/librm /tmp/$LIB done "bash find strip" "libbfd-2.40.so libsframe.so.0.0.0 libhistory.so.8.2 libncursesw.so.6.4 libm.so.6 libreadline.so.8.2 libz.so.1.2.13 $(cd /usr/lib; find libnss*.so* -type f) " for BIN in $online_usrbin ; do cp /usr/bin/$BIN /tmp/$BIN $BIN $BIN /usr/binrm /tmp/$BIN done for LIB in $online_usrlib ; do cp /usr/lib/$LIB /tmp/$LIB $LIB $LIB /usr/librm /tmp/$LIB done for i in $(find /usr/lib -type f -name \*.so* ! -name \*dbg) \type f -name \*.a) \type f); do case "$online_usrbin $online_usrlib $save_usrlib " in basename $i )* )$i esac done unset BIN LIB save_usrlib online_usrbin online_usrlib
最后删除多余的东西
6. 系统配置 静态IP配置
1 2 3 4 5 6 7 8 cat > /etc/systemd/network/10-eth-static.network << "EOF"
dhcp配置
1 2 3 4 5 6 7 8 cat > /etc/systemd/network/10-eth-dhcp.network << "EOF" true
静态resolv,conf配置
1 2 3 4 5 6 cat > /etc/resolv.conf << "EOF"
配置系统主机名
1 echo "lfs11-3" > /etc/hostname
配置系统locale
1 2 3 4 5 6 7 8 9 10 LC_ALL=en_US.utf8 locale charmapcat > /etc/locale.conf << "EOF"
其他无个性的配置省略
7. 使LFS系统可引导 创建/etc/fstab文件,用UUID替换/etc/xxx
1 2 3 4 5 6 7 8 9 10 11 12 cat > /etc/fstab << "EOF" UUID =6267 cef5-ae9a-4 b29-a2bd-006074 a45d57 / ext4 defaults 1 1 UUID =5 f9dc368-0 e0a-462 f-bc35-9 c01bd381bee /boot ext4 deaults,noauto 0 2 UUID =e1c6134b-546 c-4 a42-b38b-588851 df27e2 swap swap pri=1 0 0 EOF
中间省略
创建grub配置文件
1 2 3 4 5 6 7 8 9 10 cat > /boot/grub/grub.cfg << "EOF" set default=0set timeout =5set root=(hd0,1)"GNU/Linux, Linux 6.1.11-lfs-11.3-systemd" {
8. 收尾工作 1 2 3 4 5 6 cat > /etc/lsb-release << "EOF" "Linux From Scratch" "11.3-systemd" "Parline" "Linux From Scratch"
1 2 3 4 5 6 7 cat > /etc/os-release << "EOF" "Linux From Scratch" "11.3-systemd" "Linux From Scratch 11.3-systemd" "Parline"
检查一遍配置文件,有些没有有些有,先不管了,关机更换硬盘顺序直接验证。
9. 关机重启 关机,然后配置虚拟机
将lfs所在硬盘切换为scsi 0:0
Ubuntu宿主机所在硬盘切换为 0:1
启动。卡在booting the kernel。寻求解决方案中。